Important Information
The code uses for all size related parameters Angstroems (10-10 m) or for Q vector (A-1). In the case of scattering contrast, number distribution and any other volume contents centimeters (10-2 m).
Loading the macros
Start Igor Pro
In menu “Macros” select “Load Nika 2D SAS macros”.
New menu “SAS 2D” appears. This is where all the Nika macros are controlled from.
Unload the macros
There are two items on may wish to do to unload the macros from any experiment. First to remove the large lookup tables associated with the methods Nika is using to convert 2D to 1D data. This is done by selecting “HouseKeeping” from “SAS 2D” menu. This will make the Igor experiment much smaller (often by 60 Mb or even more).
Then removing the macros itself is achieved by selecting “Remove Nika 1 macros” in the “SAS 2D” menu. This will unload macros and put back in the “Macros” menu command to load Nika macros, if necessary.
Configure default fonts and names & Errors
“GUI uncertainty config” in the SAS menu will create panel with some controls common for all tools, like font type & size and how legend names are handled. NOTE: Panel controls are applied immediately to all existing panels, graph controls are applied ONLY to the newly created graphs (and only those which were upgraded to this behavior).
Panels font and font sizes
These controls enable user to customize font used on control panels therefore this enables customization for a given platform. This is necessary as more and more control is provided on each platform to user and therefore default fonts and font sizes may not be appropriate any more for the panels I design. These settings are actually saved on a given machine as well as the experiment. This has some interesting features, so please, read carefully:
When these controls are run (and user is forced to run them if the Irena is loaded and preferences are not found), they save preferences in special folder Igor maintains for users. At the same time, the settings are applied to the current experiment.
When this experiment is opened on another computer, the preferences from that computer are not reloaded, so the experiment will use preferences from the original computer. When the “Configure GUI and Graph defaults” is run, it will reload the computer defaults and apply them to the given experiment. Then user can change the fonts and font sizes as they wish. The new settings are saved on the computer – and within the experiment.
Note, that Panel font and font size are platform specific, so same experiment may present differently looking panels on Mac and PC.
Note, not all controls actually follow these settings, I have been changing some buttons to specific font and font size and those are not affected by these settings.
If there are any issues with the behavior, please, let me know and I’ll see if I can make it more logical.
Since version 1.70 these controls are shared with Irena package, so they do not fight with each other (which was possible previously). The whole philosophy of this GUI control system is bit convoluted, so if you see some issues, let me know when and how the logic fails.
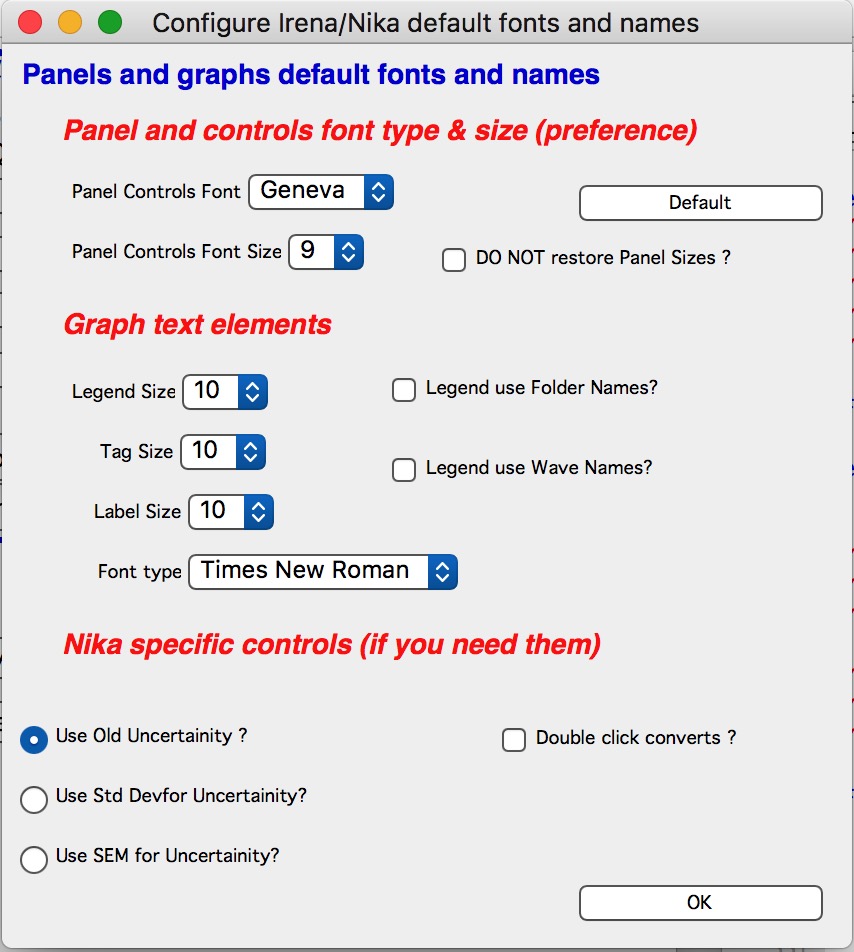
Note the choice of GUI and Graph defaults panels when different fonts are used can mess things us really well… You can mess up the panels really well by wrong choices!
Defaults button returns the panel font choices to platform specific default state (Mac: Geneva size 9 and PC Tahoma size 12). Note, that there is no guarantee that these were your choices before. But these should be reasonable choices for most setups.
DO NOT restore Panel Sizes
Do NOT restore Panel Sizes” controls if panels are restored to last used size and position when either they are recreated (they were closed and a tool is opened again) or when some existing experiment is reopened. Keep in mind, that if this checkbox is not selected, every time you scale up/down a panel, its position and size is recorded. When being recreated, the panel will move and scale back to its size. NOTE: Position and size is recorded ONLY when panel size is changed, not when it is just moved. If you want to overwrite this behavior, hold down any modifier key (alt, cmd/ctrl/shift…).
Error (uncertainty) estimates for points
Up to version 1.42 Nika used “error” calculation, which seemed to produce reasonable numbers in most cases. But one of the users realized, that it has error in it (bug) and fails in cases of really low intensities, which can be assumed to be Poisson distribution. Therefore, from version 1.43 Nika has three options for this calculation.
- Old method (default for compatibility reasons). As I said, it has a bug, but seem to work most of the time well enough.
- Standard deviation
- Standard error of mean
Please note, that Standard error of mean (SEM) is miserably small for high-intensity instruments and generally is too small. At least in my experience. However, it seems to work fine for Pilatus detectors. Standard deviation was what I was trying to get with the old method – there should not be much difference between them most of the time.
Configuration manager
From version 1.70 Nika contains “Configuration manager” . This tool enables one to configure multiple “versions” on Nika inside one igor experiment and switch among them. The main purpose is to handle cases when user needs to reduce data from multiple distances of the same instrument, multiple detectors on the same instrument, optionally from multiple instruments. We have such case on APS 9ID USAXS/SAXS/WAXS instrument where we need to reduce data from SAXS and WAXS.
How is this done?
To achieve this purpose the Configuration manager will copy whole Nika working folder – create snapshot - (root:Packages:Convert2Dto1D) into specific location (root:Packages:NikaGeometries) with user selected (cleaned up!) name. This contains everything in that folder and it is all Nika needs to operate. This therefore includes mask, lookup tables, Empty image, Dark image - everything… Of course, it is a snapshot of the status at that given time. User can then reconfigure Nika to have another distance, detector – whatever – and save this as second configuration. Then user can switch between the geometries as needed.
NOTE:
*Only one configuration can be run at given time.*
*All windows will be closed when switching. *
*The Igor files are likely to get very large (this is space expensive process).*
The save is done at a specific moment in time, so later changes in configuration are not reflected and user needs to save the configuration again.
Here is the GUI:
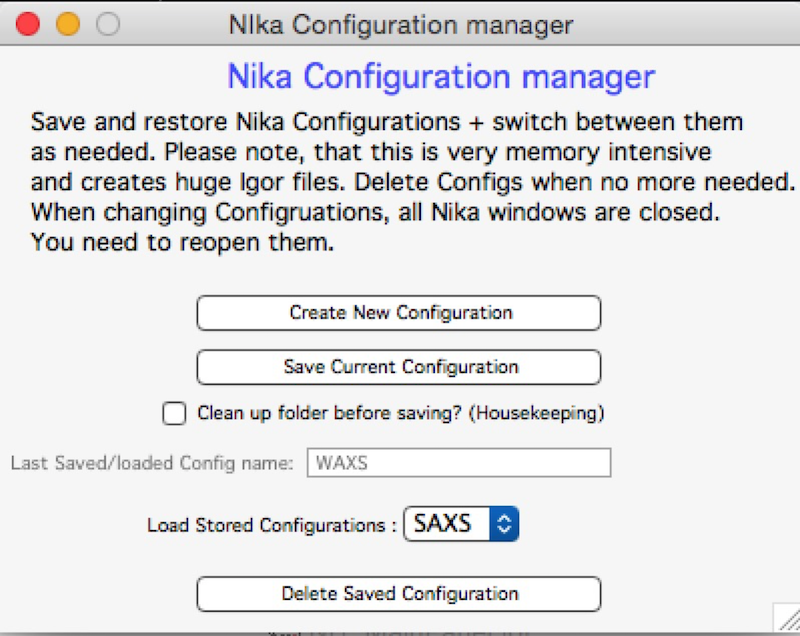
“Create New Configuration” button will create new default Nika “Configuration” – it will DELETE the current one and restart Nika. Use this button carefully. But it will guarantee that user starts with “clean slate”.
“Save Current Configuration” button will save the currently configured Nika folder into the location explained above and make it available as “Stored configuration” User can give it their own name – it will be cleaned up and if necessary (with dialog) also unique.
Note, if the Configuration already exists, you will get dialog:
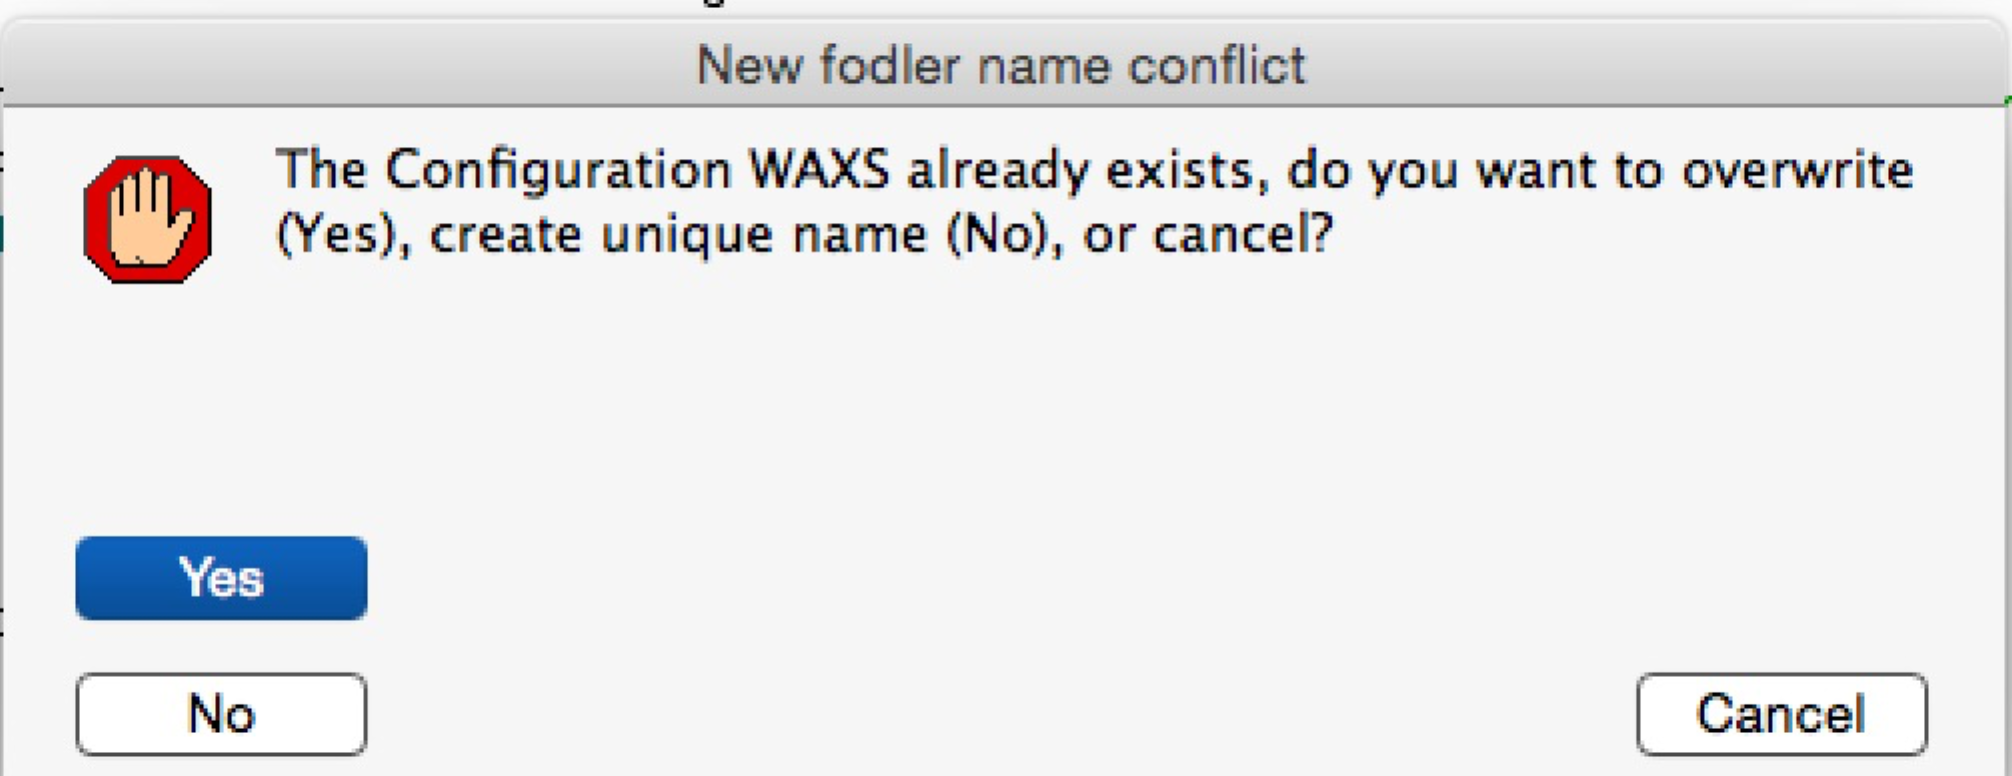
Choosing YES (= overwrite) will delete the existing Configuration of this name and save the existing one under that name. Choosing No will create unique name by adding order number at the end (from WAXS will create WAXS0, WAXS1, etc…). bCancel will cancel of course.
“Clean up folder before saving?” checkbox – This will run the “housekeeping” function before storing the Current configuration. This will remove the temporary lookup tables and other stuff, which can be easily recalculated when needed (at cost of CPU). This may make the Igor files much smaller - but when restored the first image processing will take longer.
“Last Saved/Loaded Config name” this shows what was the last name under which this Configuration was saved or loaded. This is bit dangerous name – it can become stale really quickly as it has no idea what user has done and what therefore may have changed on the configuration. Imagine you have two detector distances. You create Nika configuration for one of them (Short distance) and save it. That will show now “Short distance” as the name of current configuration… But then you proceed to change the distance (and other parameters). This string will not change – it has no idea you changed the parameters. So keep this in mind. It is simply how you called the last configuration when it was saved or loaded.
“Load Stored Configuration” – popup which lists saved Configurations. If you select configuration from this popup, dialog will come up which will enable you to : 1. Cancel if you do not want to do anything, 2. Save current configuration and load the one you selected, 3. Not save the current configuration and load the selected one. In any case, you can cancel before anything is done.
When loading saved configuration all Nika windows should be closed and after restoring the configuration, the main Nika panel reopens.
“Delete Saved Configuration” This will open dialog where you can select saved configuration and delete it. This way user can remove stored configurations when they are no more needed to save space (or confusion) in Igor experiment (file).
There is no way at this time to rename saved configurations, except manually renaming the folder in the location (root:Packages:NikaGeometries). The Configuration manager needs to be restarted after this to figure out the new names.
Using Nika on small & large displays
Nika generates a lot of windows, panels, graphs, notebooks… It really needs large display, 1024x768 is simply too small for useful work. Current version of Nika requires at least 1100 x 900 pixels display - and this is much more complicated on Widowns with the high resolution displays - see GUI Controls Missing in Common Issues….
To aid users I have now added function which calculates what the area available for content is (in Igor pixel units). On start my code now checks and if available area is smaller than preset values (1100 x 900) the code provides warning in a dialog and instructions in History area. The code will still work, but some tools may refuse to run since the panels would not fit on the screen. Users can maximize Igor window (on Windows), change the display resolution, and/or reduce the Display screen settings (“dpi”), see more info. To recheck the size after changing the settings, use command “Check Igor display size” from the menu USAXS, SAS2D, or SAS>”Help, About, Manuals, Remove Irena”.
Igor 7 has problems handling high resolution displays - 4k displays and similar - on Windows 7, 8 and 10. If you have problems seeing panel content or simply anything else looks off, please, check GUI Controls Missing in Common Issues.
GET LARGE ENOUGH DISPLAY. THEY ARE CHEAP NOW…
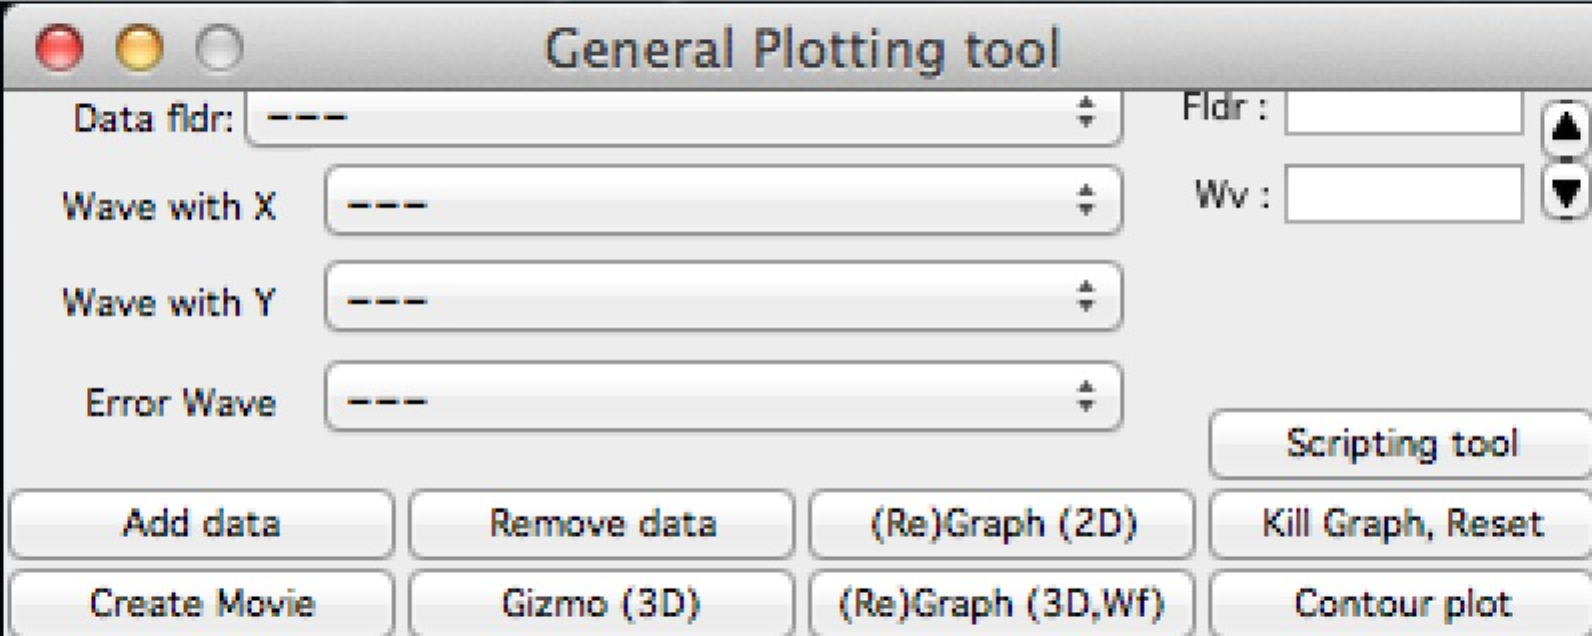
It is possible to move the content (not all, but most) up/down on panels, when needed with the arrows in top right corner:
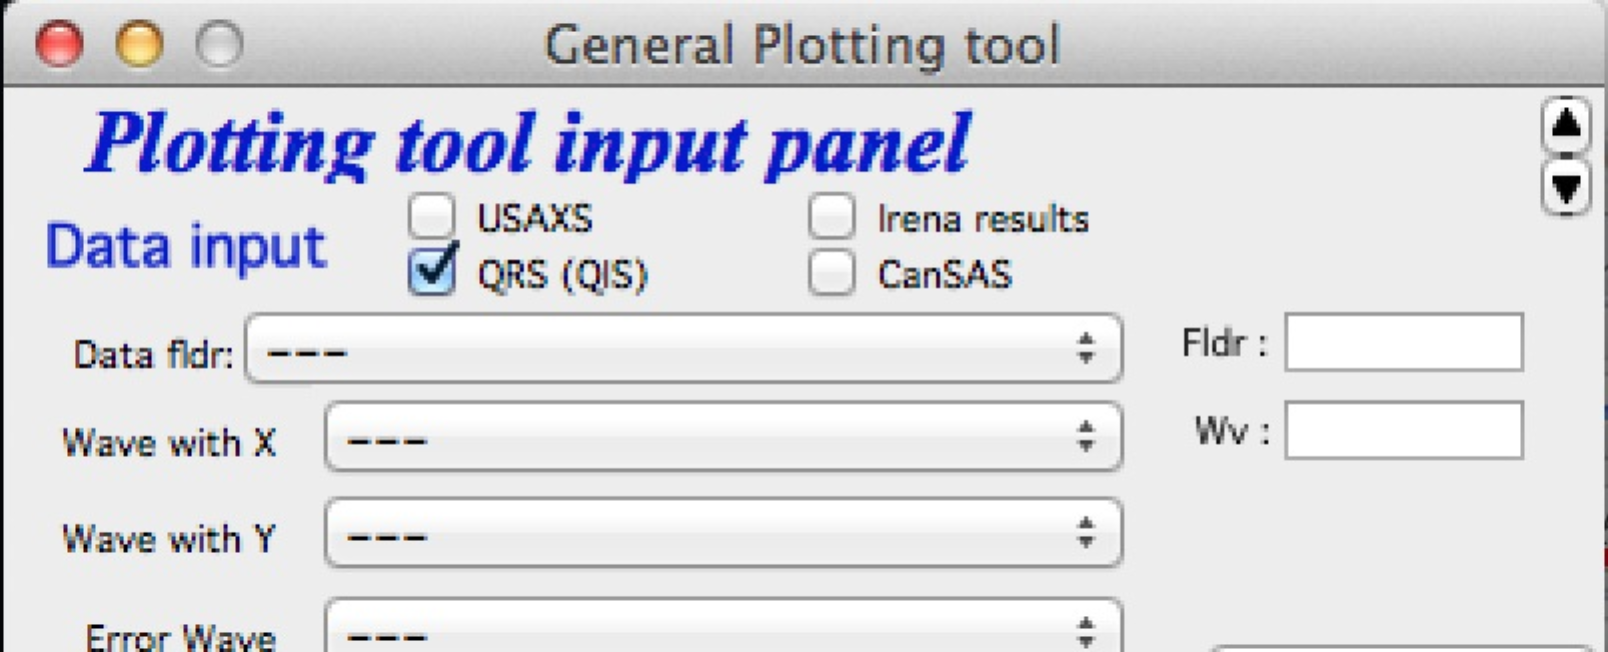
The two arrows at the top right corner of most panels - like here on plotting tool panel - move the content of the panel up/down, so if your screen is too small vertically (usual problem), you can move the controls in the screen itself. However, this is a chllenge in Igor 7 and does not work too well.
So here is the same area, but content was now moved bit higher, so one can reach to the bottom controls:
If you have a large display, you can zoom panels by dragging lower right corner - note mark:

You can scale panels up or down, but they will not scale to smaller size than original size.
NOTE: the setting of size is now persistent - in the current Igor Experiment that is - therefore, if you scale panel up and then close the panel, next time you recreate this panel, it will be rescaled for you to the same size. However, for usability in case you changed the display size in the mean time, the panel will be also imited in size to 50% width fo the current display AND 90% height of the current display. If you want to reset the panel to its default size, hold down shift/alt or cmd/ctrl key while creating the panel again. The size will be reset.
Check for updates
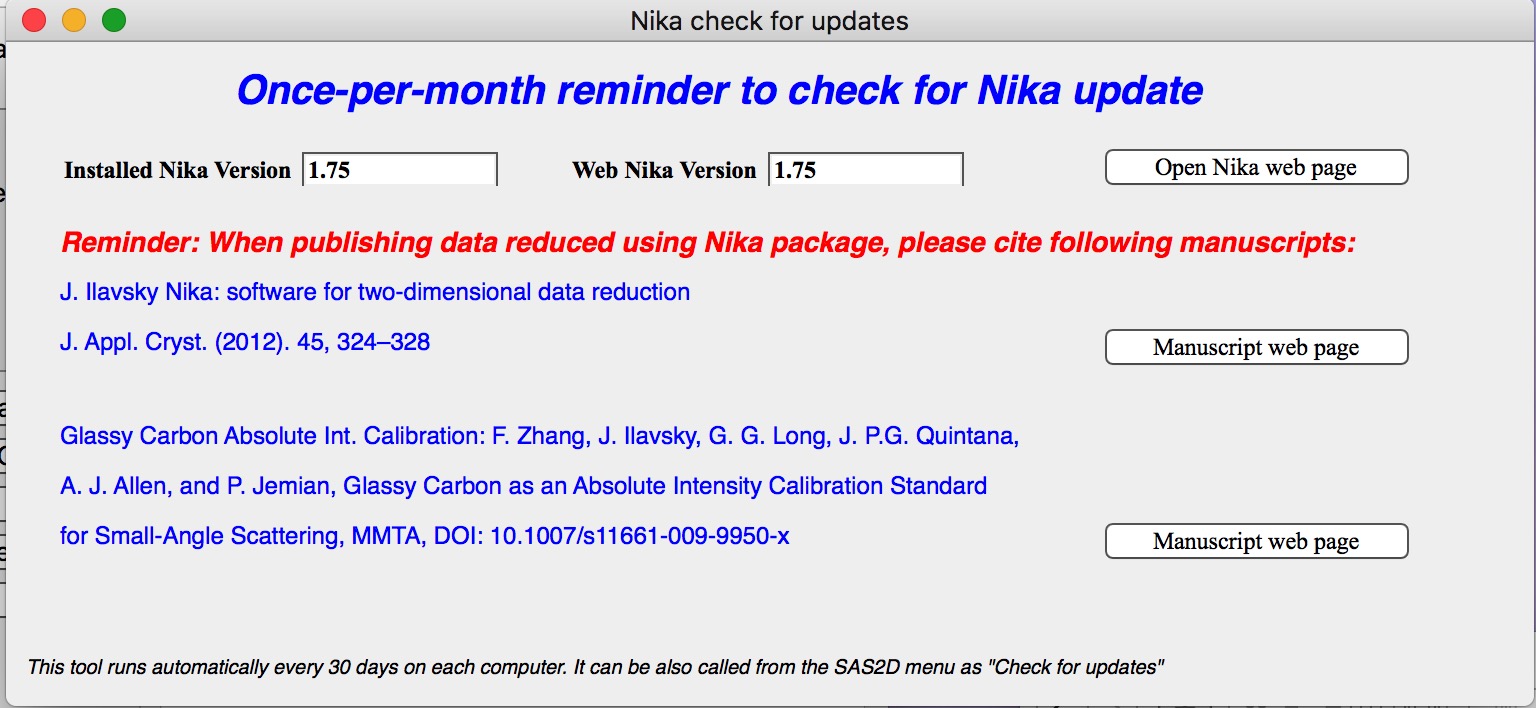
Nika will perform once-per month check for updates every 30 days. It checks installed versions of the packages and web available versions. It also reminds you about need to cite manuscripts related to the Nika. Please, cite those manuscripts as necessary.
You can get this panel opened any time from SAS 2D> Check for updates
The buttons open appropriate web pages in your web browser.
Modifying Nika functionality
Basic method of modifying Nika functionality is to use “hook” functions – functions, which are called when they exist. In order to use them one needs to be proficient Igor programmer, so the description here is limited. You will need to read the code anyway.
Note: if you need more “hook” functions, ask and I’ll add them. Better then forking your code and then not being able to update your code in the future.
List of hook functions:
| Name of hook function | Called where | Why? |
|---|---|---|
| Nika_Hook_ModifyMainPanel() | NI1A_Convert2Dto1DPanelFnct() | After the main panel is created, so user can change the panel as needed. |
| Nika_Hook_AfterDisplayLineout(int,Qvec,Err) | NI1A_DisplayLineoutAfterProc | After lineout is displayed so user can change it as needed |
| ModifyImportedImageHook(ImageName) | NI1BC_BmCntrCreateImage NI1A_ImportThisOneFile NI1A_LoadEmptyOrDark NI1M_MaskCreateImage NI1_FloodCreateAppendImage | Modifies image after import. E.g., enables user to trim image to ROI only etc. |
| PilatusHookFunction(ImageName) | NI1A_UniversalLoader | After Piltus image is loaded so one can modify it as needed. |
| ImportedImageHookFunction(ImageName) | NI1A_UniversalLoader | After loading any image just at the end. Can be used to modify loaded image as needed. |
| AfterDisplayImageHook() | Various places after Nika displays detector image. | Can be used to modify displayed image. Note – works on top image. |
| Movie_UserHookFunction() | NI1A_MovieCallUserHookFunction | In movie tool – create or modify image used for movie. See GUI. |
| Need more? | Let me know here… |
Example:
Following function is called after any image is loaded (if it exists) and simply prints in history area image statistics.
Function ImportedImageHookFunction(NewWaveName)
   wave NewWaveName
   wavestats NewWaveName
 end
Following function, if present, will zoom in top 50 pixels on the detector image
Function AfterDisplayImageHook()
    SetAxis/R left 50,0
 end